
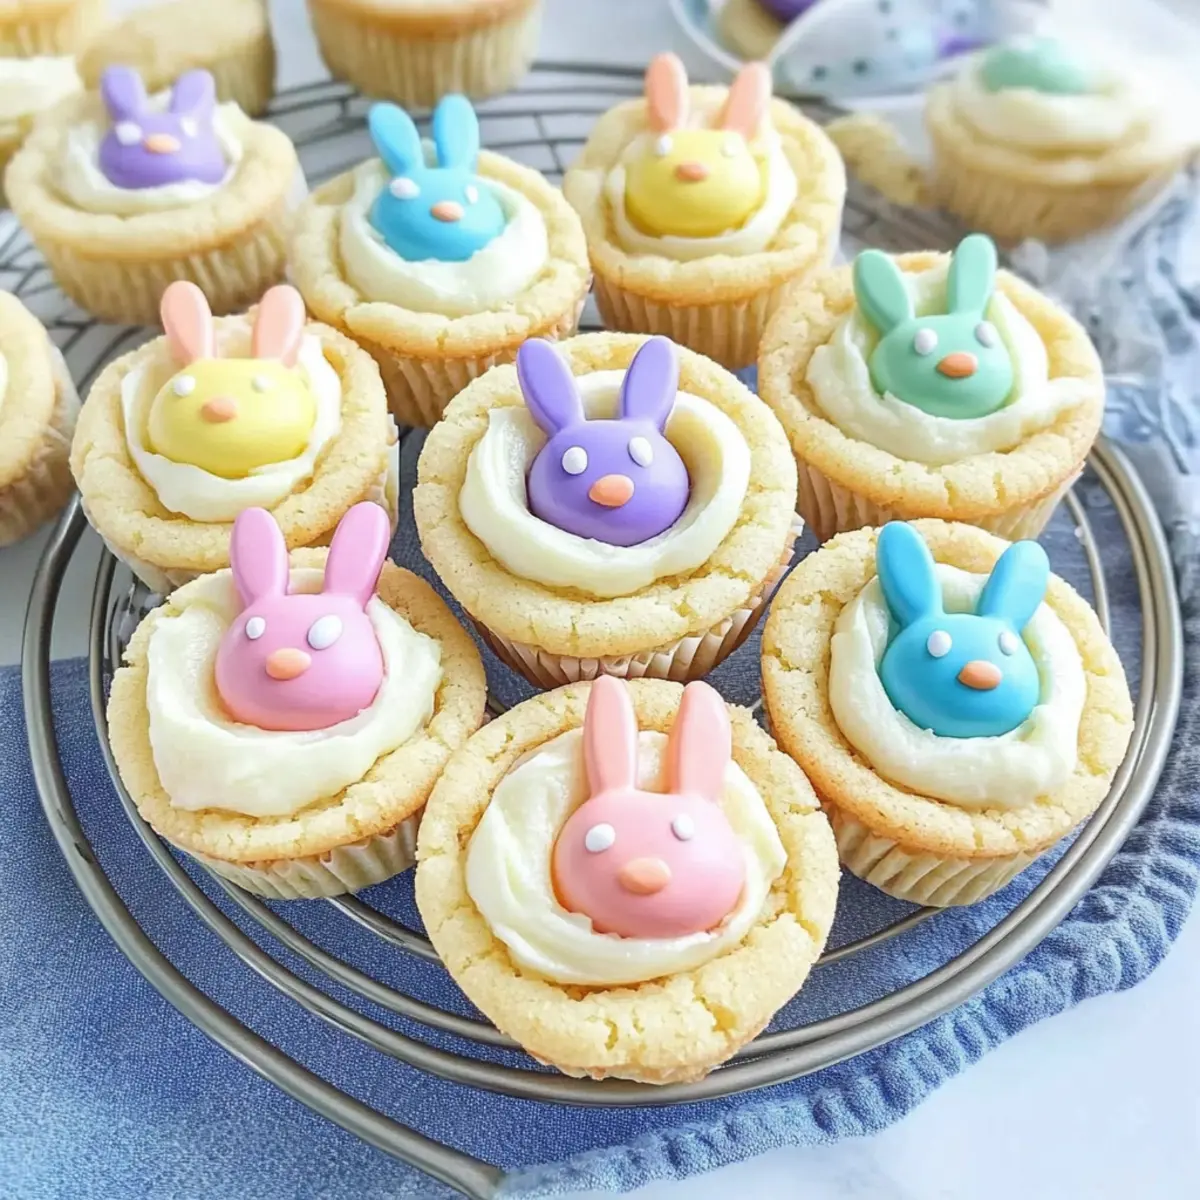
As the scent of freshly baked cookies wafts through the kitchen, I can’t help but feel excitement build for Easter celebrations. This year, I’m thrilled to introduce you to my latest obsession: Adorable Easter Bunny Sugar Cookie Cups. They’re a whimsical twist on traditional sugar cookies, bringing together a soft, chewy base made from cake mix and a rich, creamy white chocolate ganache that will make your heart melt. Not only are they quick to whip up, but these cookie cups are also perfectly customizable, allowing you to add your favorite flavors and colors for a personal touch. Whether for family gatherings or simply indulging your sweet tooth, these treats will become the highlight of any festive occasion. Curious to see how you can bring these delightful bunny cups to life? Let’s hop to it!
Why Make Easter Bunny Sugar Cookie Cups?
Delightful and Festive: These cookie cups bring a playful energy to your Easter celebrations, perfect for both kids and adults alike.
Quick and Easy: With a simple cake mix base, you’ll have these whimsical treats prepared in no time, making them ideal for last-minute gatherings.
Customizable: Feel free to use different cake mixes or fillings, like rich chocolate ganache, for a unique spin!
Visual Appeal: Topped with colorful pastel M&Ms, they not only taste amazing but also look stunning on any dessert table, comparable to Chai Shortbread Cookies.
Kid-Friendly Fun: Involve the little ones in the decorating process, creating a memorable bonding experience while crafting these adorable treats.
Each bite is a combination of delightful flavors and chewy textures, destined to become a family favorite!
Easter Bunny Sugar Cookie Cups Ingredients
-
For the Cookie Base
• Box of White or Yellow Cake Mix (13.25 oz.): This forms the sweet and chewy base of your cookies. Substitution: Funfetti or strawberry cake mix can add a pop of flavor and color!
• ¼ Cup All-Purpose Flour: Enhances the cookie structure for that perfect chewy bite. Note: It helps ensure the dough holds together beautifully.
• 8 Tablespoons Unsalted Butter, Melted and Cooled: Adds richness and moisture that makes these cookies irresistible. Tip: Allow butter to cool before mixing to avoid cooking the eggs.
• 1 Large Egg: Binds the dough and adds moisture for a tender cookie. No substitution recommended as it’s essential for binding.
• 1 Large Egg Yolk: Provides extra richness and aids in achieving that soft texture. Keep it as is for the best results!
• 2 Teaspoons Pure Vanilla Extract: Infuses lovely flavor to elevate the sweetness. No known substitutes; vanilla is irreplaceable in this recipe. -
For Rolling the Cookies
• ¼ Cup Granulated Sugar (for rolling): Adds a sweet crunch to the cookie’s exterior. Optional but highly recommended for added texture and appeal. -
For the Ganache Filling
• 1 Cup White Chocolate Chips: Creates a creamy, luscious filling that complements the cookies perfectly. Tip: Opt for high-quality chocolate for a richer flavor.
• ¼ Cup Heavy Cream: Blends with chocolate chips to form a smooth and silky ganache. No substitutes for creaminess; a lighter alternative can yield a different texture. -
For Decoration
• 58 M&Ms (or 2 per cookie cup): These colorful treats create adorable bunny faces, making them visually appealing. Tip: Use pastel-colored M&Ms for a festive look and cheer.
Indulge in these Easter Bunny Sugar Cookie Cups to brighten up your festivities!
Step‑by‑Step Instructions for Easter Bunny Sugar Cookie Cups
Step 1: Preheat the Oven
Begin by preheating your oven to 325°F (160°C). While the oven warms up, take a mini muffin tin and generously spray it with nonstick cooking spray to ensure easy removal of your Easter Bunny Sugar Cookie Cups later. Gathering your ingredients now will also set you up for a smooth baking experience.
Step 2: Mix the Cookie Base
In a large mixing bowl, whisk together the box of cake mix and flour until well combined. Next, pour in the melted butter, followed by the egg, egg yolk, and vanilla extract. Stir the mixture until a soft, cohesive dough forms, ensuring there are no dry pockets remaining. This dough will be the delightful base for your cookie cups.
Step 3: Form the Dough Balls
Scoop tablespoon-sized portions of the dough and roll them into smooth balls. If you prefer a little extra sweetness, roll each ball in granulated sugar before placing them into the prepared muffin cups. This step creates a beautiful, sugary crust on your Easter Bunny Sugar Cookie Cups that enhances their festive charm.
Step 4: Bake the Cookie Cups
Carefully place the muffin tin in the preheated oven and bake for 14 minutes. Keep an eye on your cookie cups; they should puff up slightly and develop a few cracks on the surface but should not brown. This visual cue indicates they’re perfectly baked and ready for the next step.
Step 5: Create Indentations
As soon as the cookie cups come out of the oven, use the back of a spoon or a utensil to press a gentle indent in the center of each cookie. This will form a small cup shape essential for holding the delicious ganache filling. Allow the cookies to cool in the pan for about 5-10 minutes to set the shape before transferring them.
Step 6: Cool Cookies Completely
After cooling in the muffin tin, gently transfer the Easter Bunny Sugar Cookie Cups to a wire rack. Let them cool completely, which will take an additional 10-15 minutes. This is crucial, as filling warm cookies with ganache may cause it to melt and lose its structure.
Step 7: Prepare the Ganache
While your cookies cool, prepare the ganache filling by microwaving the white chocolate chips and heavy cream in short 30-second bursts. Stir in between increments until the chocolate melts completely, creating a smooth, creamy ganache. This will be the luscious filling that makes these cookie cups simply irresistible.
Step 8: Fill the Cookie Cups
Once cooled, drizzle or spoon the silky white chocolate ganache into the center of each cookie cup. Be generous! The ganache should fill the cups nicely, adding that delightful richness to your Easter Bunny Sugar Cookie Cups. The best part is yet to come, as we’ll decorate them next.
Step 9: Decorate with M&Ms
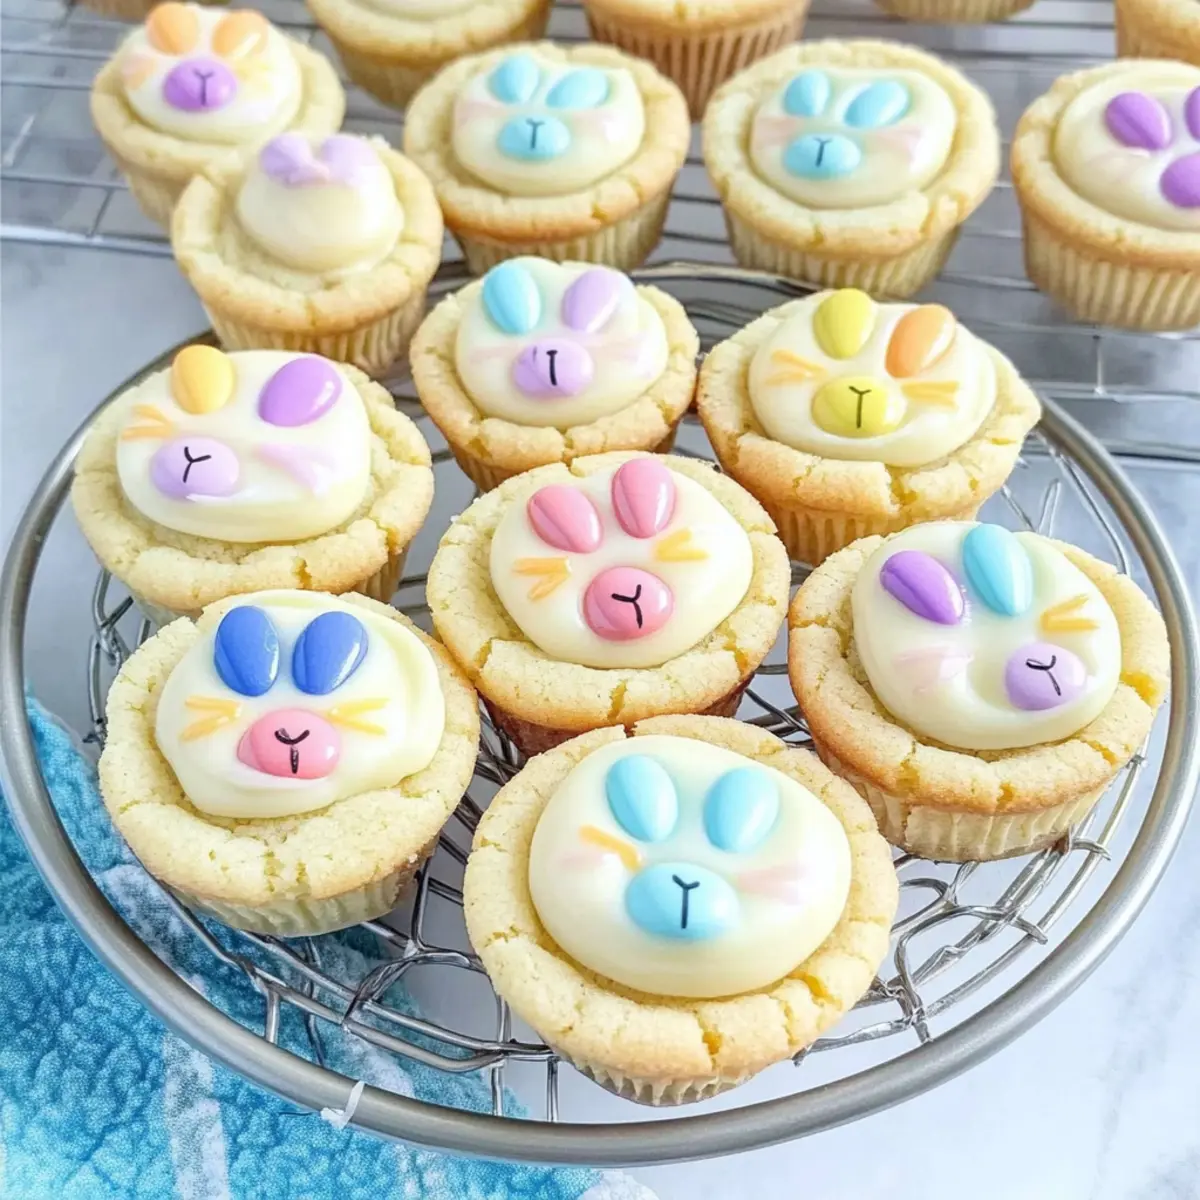
Now for the fun part: decoration! Place a whole M&M at the bottom of each ganache-filled cookie cup and gently press two halves above it to resemble bunny ears. Use pastel-colored M&Ms for a festive touch that enhances their adorable bunny look. This will surely delight kids and adults alike!
Step 10: Allow to Set
Permit the ganache to set for about 2 hours at room temperature. This will ensure a beautiful presentation while preserving the moisture of the ganache. As you wait, take in the delightful scent of these Easter Bunny Sugar Cookie Cups, knowing they’re ready to impress at your upcoming celebrations.
Expert Tips for Easter Bunny Sugar Cookie Cups
-
Chill the Dough: If your dough is too sticky to roll, pop it in the fridge for 10-15 minutes. This makes shaping easier and ensures perfect cookie cups!
-
Watch the Bake Time: Keep an eye on your cookies during baking. They should puff up slightly and crack a bit but avoid browning for the best chewy texture.
-
Quality Matters: Using high-quality white chocolate for your ganache elevates the flavor of your Easter Bunny Sugar Cookie Cups. Opt for a brand you love!
-
Decoration Fun: Let kids get involved in decorating. It’s a delightful way to spark their creativity and create memorable moments while making these festive treats.
-
Proper Cooling: Always let the cookie cups cool completely before adding ganache. This prevents melting and ensures a beautifully filled cup that holds its shape well.
Make Ahead Options
These Easter Bunny Sugar Cookie Cups are perfect for busy home cooks looking to save time! You can prepare the cookie cups up to 24 hours in advance by baking them and storing them in an airtight container at room temperature. For the ganache filling, simply whip it up and refrigerate it up to 3 days ahead; just be sure to reheat it slightly before pouring into the cooled cookie cups if it thickens. To maintain the delightful chewiness of the cookie cups, avoid filling them with ganache until you’re ready to serve. When it’s time to impress your guests, fill the chilled cookie cups with the ganache and decorate them with M&Ms for a festive touch—making your preparations both easy and enjoyable!
Storage Tips for Easter Bunny Sugar Cookie Cups
-
Room Temperature: Store your Easter Bunny Sugar Cookie Cups in an airtight container at room temperature for up to 2 days to keep them soft and chewy.
-
Fridge: If you’d like to extend their freshness, refrigerate the cookie cups in an airtight container for up to a week. This helps maintain their delightful texture.
-
Freezer: To freeze, place the cookie cups in a single layer in an airtight container, separating layers with parchment paper. They can be frozen for up to 3 months; just thaw at room temperature before enjoying.
-
Reheating: If desired, gently warm the cookie cups in the microwave for a few seconds for a fresh-out-of-the-oven experience. Be sure to enjoy the creamy ganache filling within!
Easter Bunny Sugar Cookie Cups Variations
Let your creativity shine as you customize these charming cookie cups for your Easter festivities!
-
Flavored Cake Mix: Experiment with chocolate, strawberry, or even lemon cake mixes for a unique twist. Each flavor brings its own delightful character to the cookie!
-
Ganache Alternatives: Swap out white chocolate ganache for rich chocolate mousse or fluffy whipped cream for a lighter and equally delicious filling. Whipped cream adds a fluffy texture that is irresistible.
-
Sprinkles & Crunch: Decorate with colorful sprinkles or crushed cookies instead of M&Ms for a playful look. This way, you can achieve a fun party vibe that dazzles with every bite!
-
Add Nutty Goodness: Incorporate finely chopped nuts into the cookie base for added crunch and flavor. Walnuts or pecans can provide a delicious contrast to the creamy filling.
-
Go Fruity: Top with fresh berries or fruit-flavored candies to add a fruity burst. Strawberries or blueberries not only enhance the flavor but also add a splash of color.
-
Spicy Kick: For a subtle heat, sprinkle cinnamon or even a pinch of cayenne pepper into the cookie mix to create an unexpectedly delightful flavor contrast.
-
Bunny Faces: Instead of M&Ms, use mini chocolate chips for eyes and various candies to create more complex bunny faces. Let your imagination run wild with the decor!
If you’re still exploring more enchanting treats, why not try these delightful Cherry Snowball Cookies or indulge in some Cardamom Shortbread Cookies for a fresh take on festive baking? Your loved ones will be excited to taste the wondrous combinations you create!
What to Serve with Easter Bunny Sugar Cookie Cups?
These whimsical treats are the perfect sweet finish to any joyful gathering, inviting smiles and delight all around.
-
Fresh Fruit Salad: Bursting with vibrant colors and flavors, a medley of seasonal fruits adds a refreshing contrast to the sweet cookie cups.
-
Vanilla Ice Cream: A scoop of creamy vanilla ice cream provides a delightful creaminess that pairs wonderfully with the rich ganache filling.
-
Carrot Cake Bites: Continuing the Easter theme, these moist bites offer a spiced sweetness that complements the sugary cookie cups beautifully.
-
Chocolate Milk: A glass of rich chocolate milk enhances the playful nature of these dessert cups and is sure to bring out the kid in everyone!
-
Nutty Trail Mix: A small bowl of nutty trail mix creates a satisfying crunch and balances the sweetness, offering a delightful texture contrast.
-
Lemonade or Iced Tea: A glass of refreshing lemonade or iced tea provides a zesty touch, bringing a bright and tangy balance to the sweet treats.
Each pairing complements the Easter Bunny Sugar Cookie Cups in flavor or texture, ensuring your dessert table is a true celebration of spring!

Easter Bunny Sugar Cookie Cups Recipe FAQs
What type of cake mix should I use for the cookie base?
You can use any white or yellow cake mix for these Easter Bunny Sugar Cookie Cups, but you might also enjoy the fun flavors of funfetti or strawberry cake mix for extra visual appeal and a unique taste twist! The choice is yours to be adventurous.
How should I store the cookie cups and how long do they last?
Keep your Easter Bunny Sugar Cookie Cups stored in an airtight container at room temperature for up to 2 days; this helps maintain their soft, chewy texture. If you prefer longer storage, feel free to refrigerate them for up to a week. Just make sure the container is well-sealed!
Can I freeze the Easter Bunny Sugar Cookie Cups?
Absolutely! To freeze, arrange the cookie cups in a single layer within an airtight container, ensuring you separate each layer with parchment paper. This method keeps them from sticking together. They can be frozen for up to 3 months. When ready to enjoy, let them thaw at room temperature for the best experience!
What should I do if the cookie dough is too sticky to handle?
If you find that your dough is too soft or sticky, no worries! Simply cover it and place it in the fridge for about 10-15 minutes. Chilling the dough will make it easier to roll into balls and will help your Easter Bunny Sugar Cookie Cups hold their shape when baking.
Are there any allergy considerations I should keep in mind?
Yes, indeed! These cookie cups contain common allergens like eggs, dairy (butter and cream), and gluten (from the cake mix and flour). If you’re making them for someone with allergies, consider substitutions like gluten-free cake mix and dairy-free butter or cream alternatives to accommodate their dietary needs.
How do I know when the cookie cups are perfectly baked?
The key to perfect Easter Bunny Sugar Cookie Cups is not to overbake them! They should puff up slightly and develop small cracks on the surface but should remain pale and not brown. About 14 minutes in the oven at 325°F is usually just right—trust me, you’ll want that chewy texture!

Easter Bunny Sugar Cookie Cups That Wow and Delight Kids
Ingredients
Equipment
Method
- Preheat your oven to 325°F (160°C) and spray a mini muffin tin with nonstick cooking spray.
- In a large mixing bowl, whisk together the cake mix and flour, then add melted butter, egg, egg yolk, and vanilla extract to form a cohesive dough.
- Scoop tablespoon-sized dough portions, roll them into balls, and optionally roll in granulated sugar before placing them into the muffin cups.
- Bake for 14 minutes, watching for slight puffing and cracks on the surface.
- Press the back of a spoon into the center of each cookie to form small cups and allow to cool for 5-10 minutes.
- Transfer to a wire rack and cool completely for another 10-15 minutes.
- Microwave white chocolate chips and heavy cream in 30-second increments, stirring until melted, to prepare the ganache.
- Once cooled, fill the cookie cups with ganache and top with M&Ms to resemble bunny faces.
- Allow the ganache to set for about 2 hours at room temperature.
Leave a Reply